Our Friend, the Layer Browser
Happy day to you all!
I’ve got something I need to get off my chest. As a pretty avid Cinema4D user, there are certain tools and procedures that should be second nature to anyone who calls themselves a creator inside of C4D. With that said, I have just recently figured out a tool I wish I had known more about long before now, and that tool, my friends, is the Layer Browser!
I know, I know, I’m dumb. “Tim! How have you never used the layer browser before now?!” Honestly, I have no friggin’ idea how I’ve never used it before! To me, it’s such a game changer! So I understand that I may be the only person on the planet that doesn’t use this tool, but just in case there are a few people like me, this post is just for you!
I didn’t formally learn C4D. I had a few great designers in my life that told me this was an application I had to get into and use, so I did. So I jumped in and tried my hardest to just press buttons and find out for myself what everything did to the best of my ability. Learning that way is tough because you’re not always sure what you should be looking for. I assumed the closest thing to layers I was going to get was the objects window. I’ve even used the “Add to Layer” button to help use color to see different groups of objects in the objects window. Never realizing that I was organizing objects inside this great tool that would be super helpful, if I only knew about it!
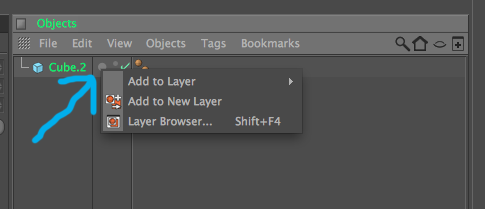
All that to say, here’s a brief overview of how this little gem works. When you’ve got a ton of objects inside of your objects window you can assign the objects to specific layers. You do this by clicking the grey circle next to the object’s name in the object window.

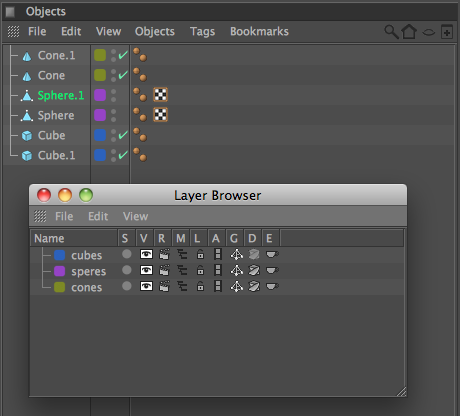
You’ve got the choice to now put that object into a new layer, or put it into an existing one. After you’ve added a number of objects to your project, and your viewer starts to get a bit cluttered, you can sort your objects into different layers then use the layer browser to do a number of things that’ll help you get around your viewer and to your objects a bit easier. As you can see here I’ve just added two cones, two spheres, and two cubes to my project. Each shape has gone into its own layer.

Now, using the layer browser I can click on any one of those icons next to the layer name to get to that group of objects in my viewer easier for modeling or animating.
Here are what each of those letters mean inside of the layer browser:
- S – Solo. This will hide all other layers but this one.
- V – Visibility. Think of this one as Hide/Unhide inside the viewer.
- R – Render. This is the same as visibility, just hides/unhides inside the render.
- M – Managers. This will hide/unhide inside the different manager windows.
- L – Lock. Pretty self explanatory. Locks/unlocks the layers to prevent changes.
- A – Animation. This will freeze the layer inside its animation based on the frame you toggled the button.
- G – Generator. This will enable/disable the generators (arrays, hyperNURBS, etc).
- D – Deformer. This enables/disables the deformers on the object.
- E – Expressions. This will enable/disable the expressions put onto the objects.
And that’s it! Nothing really groundbreaking or revolutionary here, just one of those pivotal things that I missed that I’ve now got a hold of, and I’ll never not use it again! For those of you that don’t use it, I encourage you to at least try it. And for those of you who have used it, I’m sorry for not knowing sooner. But I know now, and knowing is half the battle. GI…
Be good.
Timmy.

Hello. My name is Timmy Allen. I’m a motion designer based in South Florida. Not much bio to give at this point, but I look forward to hanging out and talking with each and every one of you then maybe someday I’ll have something impressive to say about the time I’ve spent on this planet. But so far, I started a show called “Keyframe” and I’m a part of Triune Films‘ internet show “Film Riot“. I am blessed to say that I get to do what I love every single day for a living. I love and talking to cool people. With all that, to be continued….


Thanks for the tips! I’m not a C4D user… yet. But when I do finally take the plunge, thanks to these tips, I will be ready.
Amazing… I was searching for this tab and not found…thans, very, very helpful…