Quick Tip – Parenting Attributes in Cinema 4D
I’m working on a project for Christmas that involves a ton of light and material on a nut-ton of different objects. I’m trying to give the impression that these objects are lighting up and giving off light with the beat of each instrument in the song I’m using. It’s a lot like what Soundkeys would do inside of After Effects.
I could simply put a material on each object then keyframe the luminance while using GI to share the object’s light onto the rest of the scene. Due to my delivery date I can not spare the time it would take to render out all the data for the GI. So I used a technique my buddy Nick Campbell shares on GreyScaleGorilla.com to place a colored light with physically accurate falloff inside of each object to fake the GI look I want. Which of course worked out great and gave me the desired effect without the insanely long render time.
However, keyframing two attributes per object with the beat of each instrument for a three and a half minute long song was going to just be too much to do with the timeline given. After messing around a bit, I remembered there was a way of pairing or parenting one attribute with another using simple xpresso. The best part is that you don’t even have to use the xpresso tag or do anything inside xpresso to get this functionality to work.
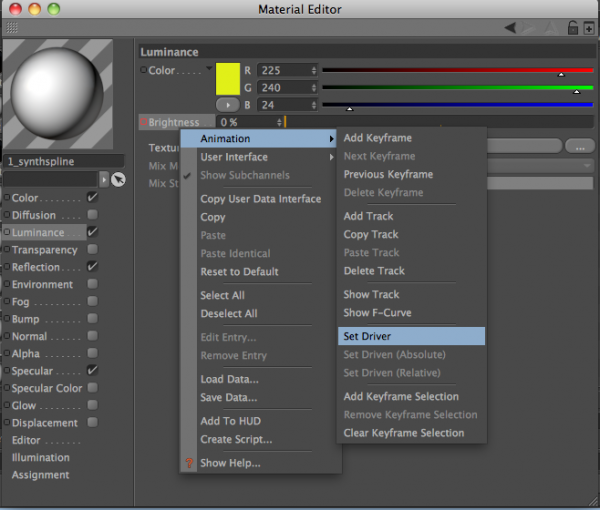
Simply right click on the attribute you plan on using as the driver and select Animation > Set Driver
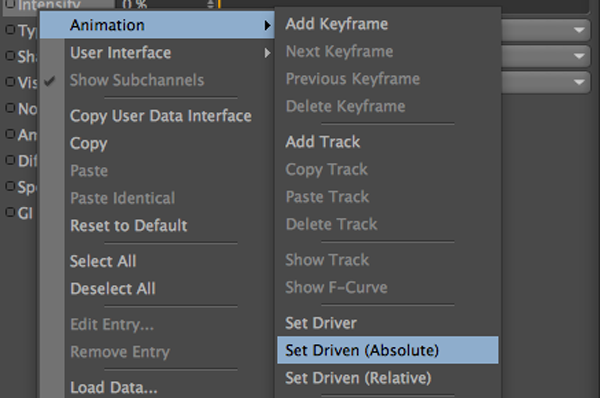
This will start the parenting process by letting C4D know that this attribute is the boss of whatever you place as driven. Next right click on the attribute you’d like to have parented to the driver you just set up by selecting Animation > Set Driven
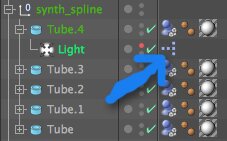
You will notice that inside the objects manager C4D automatically places an xpresso tag onto your object and writes all the parenting code for you.
Now you can keyframe the driver, and the driven will follow suite. You probably noticed that when setting up your driven there were two options: Absolute and Relative. Lets say I wanted my luminance to be 100%, but my light intensity to only be 75%. Setting the light up as a relative driven attribute will keep that 75% and move it up and down accordingly. This means that when the luminance is at 0% the intensity of the light will be at -25%. If you chose absolute then it will take the light’s 75% and bump it up to 100% and keep the two exactly equal.
Hopefully that was something useful to someone out there, I know that when I started this project I was pretty overwhelmed at the amount of things that were going to need to be keyframed and controlled. This was a huge time saver and life saver for me. Not to mention, if you are new to xpresso this is a great way to set up the automatic control then get in and see how the nodes are working to together to get you the result you’re looking for. If you’ve got any questions please ask in the comments below, or get in touch with me personally.
Be good.
Timmy.
[Ed. Note] Among , the most descriptive title to this post eluded me for the longest time. That’s why you’ll see some links titled something like “Parenting Objects in Cinema 4D Using the XPresso Tag” or just “Parenting Objects in Cinema 4D”. I assure you, all links lead back here.

Hello. My name is Timmy Allen. I’m a motion designer based in South Florida. Not much bio to give at this point, but I look forward to hanging out and talking with each and every one of you then maybe someday I’ll have something impressive to say about the time I’ve spent on this planet. But so far, I started a show called “Keyframe” and I’m a part of Triune Films‘ internet show “Film Riot“. I am blessed to say that I get to do what I love every single day for a living. I love and talking to cool people. With all that, to be continued….


I don’t use cinema 4d, but I just wanted to say that that blue arrow is quite good haha
Ha! Well I’m happy you got something out of it. Thanks so much Teresa.
Hi Tim,
Good to find you again here with good tips, as I miss you on film riot!
Cheers.
So, with you having the luminance driving the intensity of the light for each object, does that mean you had a separate texture for each individual object?
great article timmy, it might come in use for me some day.
Very very Nice work! Can U tell me how you assign the music in C4D With each elements?
Thanks! ;)