Quick Tip – After Effects Flowchart
When working in After Effects and its infinite layers, you may find it a bit confusing and frustrating when looking at a large project and the multiple compositions, layers, solids, footage and so on even when you have created precompositions and nested your comps. There is a way to view all of your attributes and see how they are working together to help you sort out your project and improve your workflow, and it’s called the flowchart.

Anybody who’s worked in programs such as Apple Shake will immediately recognize this view as the node view, and it isn’t too different from it either. Let’s take a look at the flowchart in Adobe After Effects.
Creating a Flowchart
You can easily create a flowchart two ways. The first is by using the menu and selecting Window > Flowchart. The title of the comp behind it is the flowchart it will display information for.

The next is by clicking the icon at the bottom of your composition window that looks like three boxes with lines connecting them.

Understanding the Flowchart
The flowchart is simple to understand and use once you know how things are set up. If you look down in the bottom left corner of the flowchart, you’ll notice six icons. These are the six options available to you when looking at the flow chart.

- Show Footage: This will simply turn on/off footage in the flowchart if you want to view it or not.
- Show Solids: Much like option 1, this will turn on/off solids in the flowchart.
- Show Layers: Again, this will turn on/off layers in the flowchart.
- Show FX: This will turn on/off any Effects you have on all of the attributes in the flowchart.
- Toggle Straight/Curved Lines: Toggles between straight or curved lines between your attributes in the flowchart. If you move around attributes in the flowchart and want to tidy it up, you can hold down the option key on your keyboard and click this button and everything will instantly be aligned.
- Flow Direction: This changes the direction of the flow of the flowchart. Your options are: Top to Bottom, Left to Right, Right to Left, and Bottom to Top.
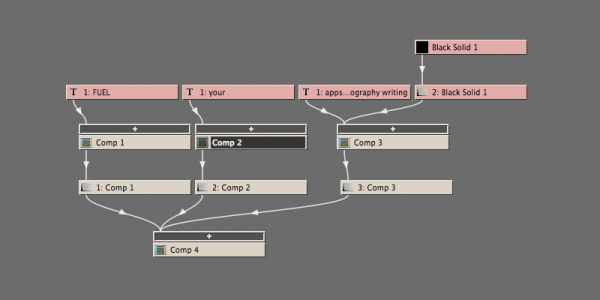
Finally, let’s take another look at the flowchart and see if we can make sense of it all.

From what we’ve learned about the flowchart we can tell the Flow Direction is Top to Bottom because all the arrows are pointing down like they are literally flowing from the top to bottom. Bottom to Top would be reversed, Left to Right would be flowing from the left to right, and Right to Left would be opposite of that.
Looking a little deeper into this we see at the bottom is my main comp titled, generically enough, Comp 4. inside of that comp are three layers (1: Comp 1 – 3: Comp 3) made up of three different compositions (Comp 1-3) which are, in turn, made up of the smallest parts; here they are text layers and a solid inside another layer. If I had any effects in this comp they would be labeled under the title of the solids that they are being used on. Clicking the + button above the compositions will collapse and expand that line of attributes to help you view only what you want.
That, my friends, is the flowchart. It’s simple to understand once you take the time to play with it, and it can help you out a lot if you use it, especially on larger projects. If you ever find yourself staring down a large group of attributes and have no idea how they are all connected (for example, coming back to a project after taking a bit of a hiatus), the flowchart will help you make sense of it all.

John Kostrzewski is the Editor of Fuel Your Motionography and a freelance motion graphics and visual effects artist, videographer and writer living in Minnesota. He is awesome. Follow him on Twitter at and .


Thanks for the quick look at this John!
Do you find that you actually use the flowchart in every day work? Or is it more something that you turn to when you’re racking your brain on how stuff is all tying in together?
I guess it depends on the project. I definitely don’t use it on every project, but find it comes in handy on the larger or even mid-sized projects, especially the ones I’ve been away from for a long time and don’t remember how I’m piecing the project together. On smaller projects I usually know how things are running together or I can get a good look at them by flipping down the used attributes of each layer (select the layer and press the U key). It’s a good resource to help you wrap your mind around your project. It’s also a good way to help people who are moving over from node based systems to help them figure out how things in AE flow together and make them feel more comfortable.
I appreciate the comment and question, Josh!
Thanks for pointing this out. I’ve never explored the Flowchart option in AE before. I will certainly have to. This will save me tons of time on larger projects!